I recently raved about how pleased I am that my blog is finally being hosted on AWS, so I thought I’d write about how it all works. AWS is a complex beast with a daunting number of services. For the purposes of hosting a static website, though, we only need concern ourselves with the following:
- Route 53 is a managed DNS solution that offers a lot of control. This isn’t strictly necessary to host a static website, but it’s quite convenient because of how tightly integrated into everything else it is.
- Certificate Manager does what it says on the tin. This eponymous service allows you to import any existing certificates you might have and to generate public ones for free!
- S3 is Amazon’s Simple Storage Service which is where we’ll put our files for the static website. Files are stored in buckets which can be configured to host files directly, or you can use the REST API from other AWS services or that cool app you’re developing.
- CloudFront is Amazon’s CDN service which isn’t strictly necessary either, but I’m including it in this list because it provides a convenient way to enable SSL on your website with almost no cost.
- Lambda is a serverless computing solution which allows you to write small scripts that react to events generated by AWS services or REST requests. This is a really cool service that I hope to experiment with more. For the purposes of a static website, though, I just use it for some URL rewriting rules.
I use Gatsby to generate the static files for my blog, but I won’t go into the detail of using that—I’ll assume you have your own favourite generator that simply dumps files into some directory for you.
What are the options?
Option 1: Keep it simple
The simplest possible setup is shown in the figure below. For this, you only need to use AWS S3 as a place to store your files and your domain registrar’s DNS tools to forward your domain to your S3 bucket. If your registrar’s tools aren’t good enough, you can set the name-servers of your domain to Amazon’s Route 53 and then use that instead. This will cost you a whopping 50 cents per month (plus tax), but it’s worth it.

Using this architecture is certainly easy, but it doesn’t support SSL and you
end up with your website available at another (albeit not advertised) domain of
the form http://<bucketname>.s3-website.<region>.amazonaws.com. This isn’t
the end of the world, I guess, but it’s not ideal.
However, the most important downside of this approach is that you may end up
inadvertently duplicating your content on your naked domain and the www.
sub-domain. Your page rankings may be harmed by doing this, so it’s in
your interest to pick exactly one to be your canonical address and have the
other one do a 301 redirect to this. Strangely, this feature is missing from
Route 53 as far as I could find.
Option 2: Let’s add HTTPS
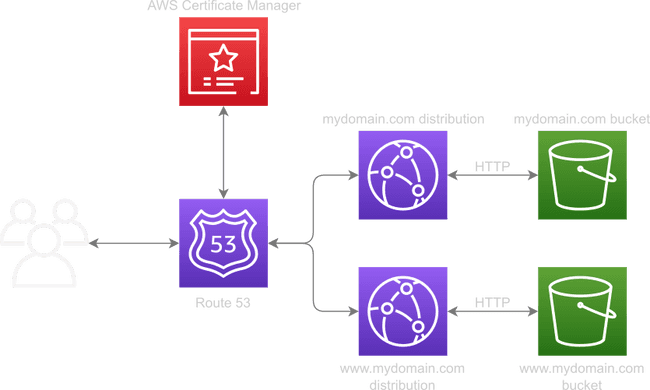
A common architecture I found discussed in other tutorials is that shown above. It builds on the simplest possible architecture by using CloudFront to provide HTTPS and uses a second S3 bucket to perform the redirect to the canonical domain.
Whilst this works, it’s quite heavyweight. CloudFront is a content delivery network (CDN) provider, so having a second distribution purely to support the redirect feels excessive to me. Especially when you consider the second S3 bucket is deliberately empty.
It is quite simple to set up, though.
Option 3: Can we do better?
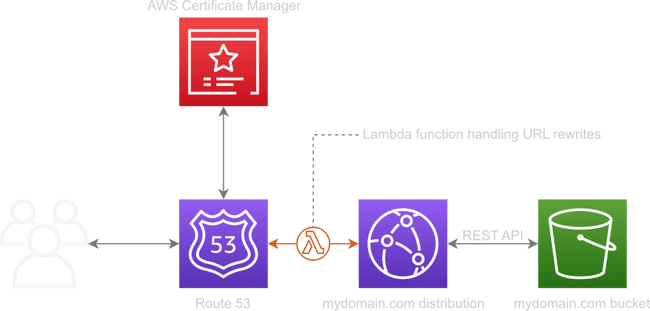
I actually used Option 2 when I first moved this site over to AWS because I hadn’t discovered Lambda@Edge yet. This service is really cool. Lambda is cool on its own, but Lambda@Edge allows you to execute functions on CloudFront’s edge nodes. These are the regional servers that allow your content to be hosted much faster because they’re geographically closer to your readers.
With this approach, CloudFront uses the REST API of S3, meaning that your bucket is never made public—there’s no hosting enabled of any kind. When you set up your CloudFront distribution (you’ll see some screenshots soon), the source drop-down is auto-populated with your bucket names. Most tutorials simply say “don’t use this, it won’t work” without explaining why.
CloudFront has two methods of obtaining its source content: the first is to
simply connect to some other webserver using HTTP and cache the content from it,
the other is to connect to an S3 bucket directly via its REST API. The former
approach has the appearance of just working because it delegates the URL
resolution to the source webserver, whereas URLs must be exact with the REST
API. What this causes in practice is that URLs for directories don’t load their
index.html files, instead returning an annoying access denied XML fragment.
When you query for a URL of any kind, CloudFront simply passes that exact string
to the source, which in the case of a webserver, will be resolved to the
index.html because that’s the de facto standard. However, with the REST
API, that object doesn’t exist.
This is where we can leverage Lambda@Edge! We can write a very small JavaScript function to normalise URLs that look like directories and, whilst we’re there, perform the redirect to our canonical hostname. We don’t need to use another webserver or to have an empty bucket to do the redirect. We don’t even need the bucket to the public! This solution even serendipitously optimises your Edge cache usage because you won’t have multiple keys pointing to the same resource!
It’s a win all-round! Let’s get started.
Preparation
To begin, head over to AWS and set up your free account. You’ll need to enter credit card details, but don’t worry, it’ll only cost pennies unless you have an exorbitant volume of visitors. I’d recommend enabling MFA for peace of mind. It works with a range of authenticator apps (including Google’s), so it’s pretty unobtrusive overall.
All AWS tools have pretty good web interfaces; you can upload your content
through S3’s UI if you like. However, for us programmer types, it can be more
convenient to use awscli which lets you do the upload on the command line.
There’s a very useful s3 sync command which behaves similarly to rsync on
Linux systems.
$ aws s3 sync --delete public/ s3://<bucket-name>This command will upload only new files to your bucket, and will delete files in your bucket that don’t exist locally. It’s neat and simple.
Getting some storage
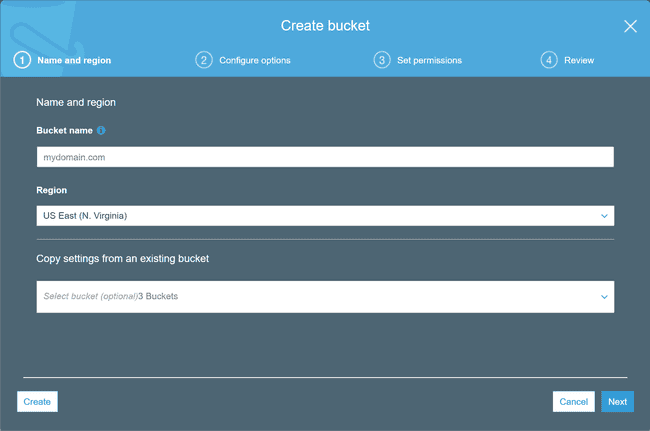
Next, head over to S3 (click Services in the top-left, then it’s in the “Storage” section) to create your bucket. Bucket names need to be unique across all of AWS (as far as I can tell); a useful way of achieving this is to just use the same name as your domain. It’s also worth mentioning that bucket names need to be DNS-compliant, even though we won’t be hosting directly from it.

You’ll need to select a region to store your files in. I have mine in a London-based bucket because I live in the UK, but North Virginia can be a useful choice because there’ll be lower latency between CloudFront and your bucket—practically speaking, this latency is too small to care about unless your visitor volume is huge. The defaults for the remainder of the configuration of the bucket are fine for our needs, so you can just click the “Create” button on the first page shown below.
Now you can click on your newly created bucket in the default S3 listing to see
the page shown below. You can simply drag your files into this page to start
the upload. Nice and simple. Or, for increased coolness-factor, use the s3
sync command given earlier.

Cool, we have our files in the cloud now.
DNS, routes, and certificates
Let’s cost you some exorbitant fees. Route 53 is the only service that’ll cost money right from the start; the others only cost if you exceed the free-tier allowances. These are pretty generous, so this isn’t likely to happen right away.

Route 53 is under the “Networking & Content Delivery” section on the services
drop-down. Find the Hosted Zones section shown in the figure above and click
the the large blue button to create a new one. Enter your naked domain name
(e.g., mydomain.com) and any comment if you want. The comment is just a
human-readable label for convenience; you can see I have mine set to “Personal
blog”.
Click on your newly created zone, and there should be three records there with
default values. The NS record contains the hostnames of several name-servers
that are part of AWS. You’ll need to use your domain registrar’s tools to set
the name-servers of your domain to these values. Every registrar is slightly
different, but they all have some mechanism to achieve this.

Now we can get a free SSL certificate by using the AWS Certificate Manager; it’s
under the “Security, Identity, & Compliance” section on the services menu. Make
sure your region is set to North Virginia because CloudFront only accepts
certificates stored here, then click the blue “Request a certificate” button
(see the figure above). On the next page, choose the public certificate option,
and enter your naked domain name into the box. Click the button to add another
domain, which should be your www. sub-domain, as shown below.
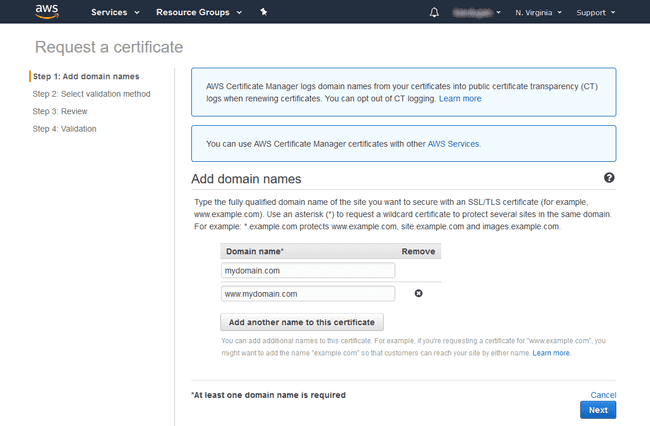
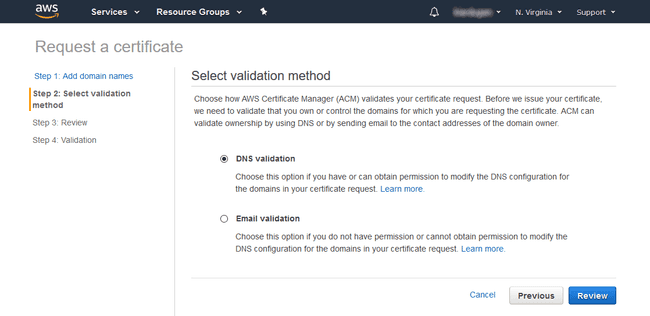
AWS will now confirm that you control the domain before you’ll be presented with a certificate. After clicking next, you’ll be faced with a decision between DNS or Email validation. Because we’ve set up a hosted zone with Route 53, DNS validation is the simplest option. Choose this and complete the wizard to be be presented with a table providing instructions on the DNS configuration required. Click the “Create record in Route 53” button for both domains to have the Certificate Manager do all the work for you.
Your validation status will change to “Success” after about 30 minutes or so.
Functional engineering
In the meantime, we can create the Lambda function that’ll tie everything together. Let’s recap why this is even needed. There are two problems we need to address:
- CloudFront has two modes of operation, either it’ll cache things from a conventional web-server, or it’ll try to read objects directly from an S3 bucket. We’re using the second approach because it means our bucket can remain private (you could even serve all your websites from the same bucket with this approach, if you wanted to). However, because there’s no conventional web-server in the loop, directory URLs won’t be resolved to their index page because CloudFront queries for the exact resource name.
- We may harm our page rankings by hosting the same content in multiple
places, so we need to pick either the naked domain or our
www.sub-domain as the canonincal hostname and force a redirect to that.
CloudFront allows you to bind Lambda functions to any combination of the processes shown in the diagram below (this is from their official documentation), allowing you to customise how your content is served. This is very powerful. You can use it to do A/B testing, serve country-specific content or do redirects, authenticate, etc. Our use-case here is quite basic compared to what’s possible.
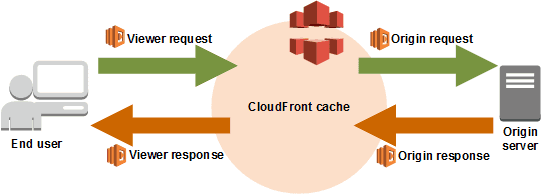
We need to intercept “viewer requests” and either adjust the URI to include
/index.html or return a 301 Moved Permanently response. Lambda@Edge functions
all have the following form and must be written in JavaScript using either
the Node 6.10 or 8.10 runtime.
'use strict';

exports.handler = (event, context, callback) => {
  const request = event.Records[0].cf.request;

  callback(null, request);
};
The second parameter of callback can either be a request for CloudFront to
continue processing or a response to issue back to the viewer. The structure
of these objects is a bit weird, but the "uri" field is
guaranteed to be a POSIX-path, so we can just use the path
package to make things simple:
const path = require('path');

function rewriteUrl(request) {
  // Detect URIs that look like directories and modify them to point to the
  // appropriate index page.
  if (!path.extname(request.uri)) {
      request.uri = path.join(request.uri, 'index.html');
  }

  // Continue with the modified URI.
  return request;
}
This is a bit naive because it assumes all URIs without extensions must be
directories. I guarantee this in my websites because I don’t host README or
LICENSE files directly—they all live in repositories. I’m sure this’ll come
back to bite me one day…
Next up, we need to generate a redirect if our hostname isn’t the one we’ve chosen as canonical. In an ideal world, we’d use this opportunity to redirect HTTP to HTTPS as well, however I haven’t confirmed if the request protocol is given to the function. This isn’t a blocker as we’ll later configure CloudFront to do this for us, but it’d be far more elegant if we could achieve everything we want in just one redirect.
function redirect(canonicalHost, request) {
  // If the server isn't the right one, make sure we move to it.
  if (request.headers.host[0].value !== canonicalHost) {
    // Generate a HTTP redirect to select the right hostname.
    const response = {
      status: '301',
      statusDescription: 'Moved Permanently',
      headers: {
        location: [{
          key: 'Location',
          value: `https://${canonicalHost}${request.uri}`,
        }],
      },
    }

    return response;
  }

  return request;
}
The function above is pretty naive, too. If the hostname isn’t our canonical
one, redirect to it using HTTPS. This is fine in this scenario as the only two
hostnames that forward to the CloudFront distribution are the naked domain and
the www. sub-domain. Using Lambda@Edge you could create all manner of crazy
redirects and URL rewriting schemes, so if you venture down that road, just bear
this in mind. Let’s put it all together in a single helper function:
'use strict';

const path = require('path');

/**
 * @summary Performs a URL-rewrite or a permanent redirect as required.
 *
 * If the given request uses the canonical hostname and the URI appears to refer
 * to a file, this function does nothing.  However, if the hostname is not
 * canonical, it will generate a permanent redirect without adjusting the URI;
 * and if the URI appears to refer to a directory, it will rewrite it to refer
 * to an index.html page.
 *
 * **Note:** The canonical protocol is always assumed to be HTTPS.
 *
 * @param {string} canonicalHost - Hostname that should be redirected to.
 * @param {object} request       - Request object from the Lambda invocation.
 *
 * @returns Either a redirect response or an adjusted request.
 */
module.exports = (canonicalHost, request) => {
  // If the server isn't the right one, make sure we move to it.
  if (request.headers.host[0].value !== canonicalHost) {
    // Generate a HTTP redirect to select the right hostname.
    const response = {
      status: '301',
      statusDescription: 'Moved Permanently',
      headers: {
        location: [{
          key: 'Location',
          value: `https://${canonicalHost}${request.uri}`,
        }],
      },
    }

    return response;
  } else {
    // Detect URIs that look like directories and modify them to point to the
    // appropriate index page.
    if (!path.extname(request.uri)) {
      request.uri = path.join(request.uri, 'index.html');
    }
  }

  return request;
}
Having this function in a separate file makes it easier for us to do tests and use it elsewhere; I’m going to completely gloss over that here and focus on getting it hosted. We need a package Lambda can push out to CloudFront’s edge nodes. First, we need to modify our handler function to invoke the helper function we’ve just made:
'use strict';

const rewriteUrl = require('./rewriteUrl');

exports.handler = (event, context, callback) => {
  const request = event.Records[0].cf.request;
  const canonicalHost = 'mydomain.com';

  callback(null, rewriteUrl(canonicalHost, request));
};
To upload the Lambda function, we need to provide the service with a .zip file
containing our runtime1. Let’s assume this function lives in
index.js, the previous lives in rewriteUrl.js, and both of these have been
placed inside rewrite.zip. Open the Lambda console (it’s under the “Compute”
section in the Services drop-down) and select “Functions” in the menu on the
left. You should be greeted with the following:
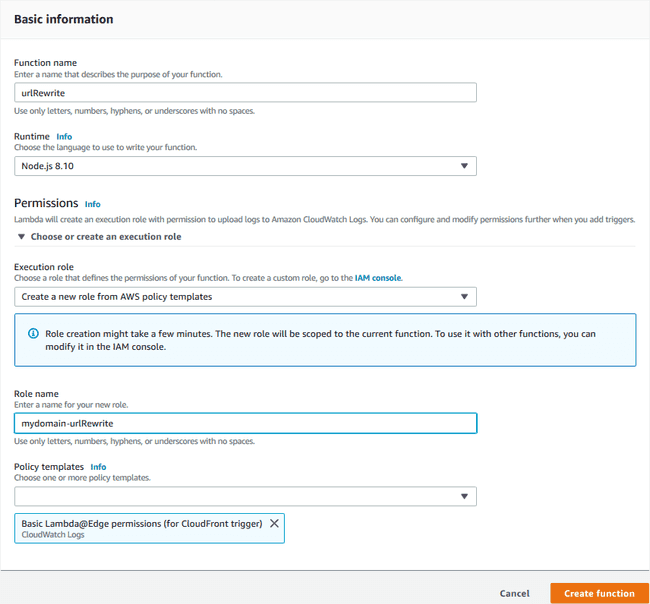
As with the Certificate Manager, make sure your region is set to North Virginia. Click the “Create function” button to begin the wizard shown below. The name is primarily beneficial to you as the user, so you can enter whatever you like here (as long as you adhere to the rules, of course). Whilst Lambda supports quite a few different runtime environments, Lambda@Edge only supports two Node.js LTS runtimes: either 6.10 or 8.10. I chose the latter because it’s newer. For the permissions, select “Create new role from AWS policy templates”, enter a useful name for it, and select “Basic Lambda@Edge permissions (for CloudFront trigger)” as the template. Click “Create function” to open a new console for the function.
Scroll past the “Designer” section to find the “Function code” section shown
below. Set the code entry type to be a .zip package and click upload to find
rewrite.zip. The handler is the full name of the function to be invoked; we
exported exports.handler from index.js, so ours is index.handler. Once
you’ve done this2, click the orange “Save” button in the top
right.

The “Function code” section should now change to a code editor, hopefully
displaying what you’re expecting. There is a rudimentary test facility that you
can use to supply the function with indicative data. To the left of the “Save”
button is a “Test” button and a drop-down displaying “Select a test event” by
default. Click on the drop-down and select “Configure test events.” Select
“Amazon CloudFront HTTP Redirect” as the template and adjust the "Host" and
"uri" to the values you want to test with. You can create up to ten test
event configurations, which will all be available from this drop-down on the
function’s console. Click the “Test” button to execute a test configuration.
This capability isn’t great, but it’s better than nothing.
After you’re sated from plenty of testing, select “Publish new version” under
the “Actions” menu to the left of the test configurations drop-down. This
creates a qualified version of your function that you can see under the
“Qualifiers” menu. CloudFront will only bind to Lambda functions with a
version, so we can’t use the $LATEST.

Publishing a new version will generate a new resource name (ARN) which you can see in the top-right of the Lambda console. Make a note of this because you’ll need it now to set up CloudFront.
Global distribution
Now we need a distribution to serve our content and invoke our Lambda function. Thankfully, this step is quite easy—creating the Lambda is by far the most complex step. Before you continue, check the status in Certificate Manager because we can’t continue if it’s still trying to validate your domain. Once you have your certificate, open CloudFront’s console (it’s under “Networking & Content Delivery” on the Services menu). You should see something like the following:

Notice that the region is ‘Global’ instead of anything more specific. As it’s a CDN, the reason for this should be fairly obvious, but replication of things other than content always starts from North Virginia. If your certificate is taking ages to issue or your Lambda won’t deploy or something similar, please check that the source regions on everything else is set to North Virginia. Your S3 bucket is the only service we’re using that can be located elsewhere (to restate from earlier: mine’s in London).
Click the blue “Create Distribution” button and select a web distribution on the next page. RTMP is used for streaming media files rather than hosting static content, so we can ignore it. After clicking the right “Get Started” button, you’ll see a huge list of stuff you can configure. It probably looks a bit daunting, but we can ignore most of this too. Click in the “Origin Domain Name” edit box and a pop-up containing, amongst other things, your S3 bucket name should appear.
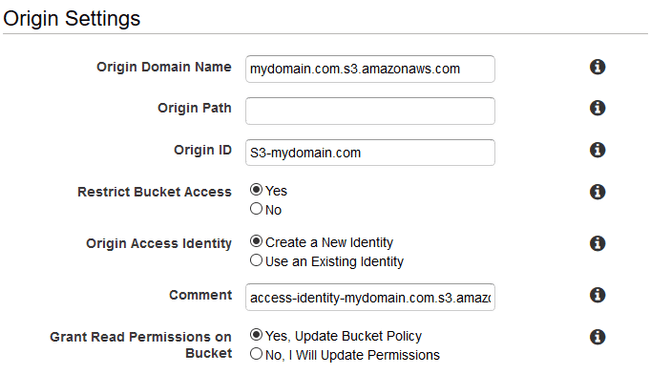
Enable “Restrict Bucket Access” and make CloudFront do the work of creating a new identity and updating your bucket policies. Your configuration should look similar to what’s shown above.
For most of the cache behaviour settings, the defaults are fine. Make sure you
select “Redirect HTTP to HTTPS” to deal with our Lambda not being able to do
that for us, and you only need the GET and HEAD HTTP methods enabled for a
static website. At the bottom of this section is “Lambda Function
Associations”; this is where we can cast our magic prepared earlier. Select
“Viewer Request” as the event type and paste the ARN for your Lambda function
that you noted down earlier.

Finally, we need to configure the distribution settings. Almost all of these settings are good as they are, but we need to make sure CloudFront knows about our domain names. Set them both in the “Alternate Domain Names” box as shown below. Then enable your certificate by choosing “Custom SSL Certificate” and clicking in the edit box below it. This should bring up a drop-down listing all the certificates that AWS is managing for you. If this box is empty, then either your validation is still pending, or your certificates exist outside of North Virginia.
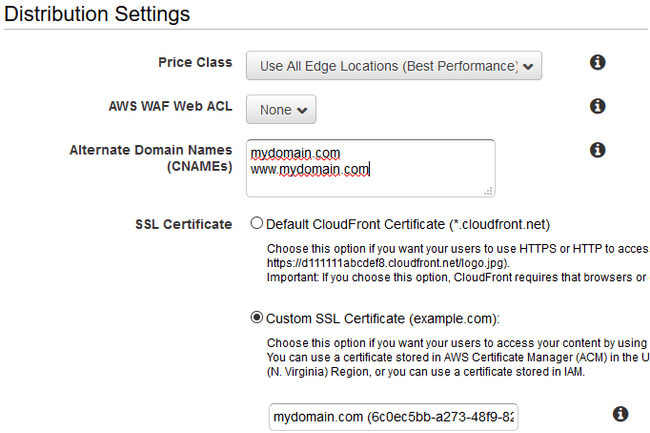
At the bottom of this section is a “Comment” box that you can use to label this distribution, if you like. This is, of course, completely optional. Once you’re happy with your configuration, click the blue “Create Distribution” button at the very bottom of the page. This should put you back at your distributions listing with your new distribution “Deploying”.
Closing the loop
All the important pieces are now in place, we just have one final task to
complete: the domain name needs to point to our CloudFront distribution. Make a
note of the domain name of your newly-created distribution (it’ll look something
like d1hjkadk87a8cag87.cloudfront.net) and head back to Route 53.
Select the Hosted Zone you created for your domain and click on the ‘A’ record. Change it to be an Alias and set the “Alias Target” to be the CloudFront domain name you copied a moment ago. You might see a few warning triangles appear, which is quite normal when a CloudFront domain is still deploying. Save that using the conveniently-placed button at the very bottom of the page.
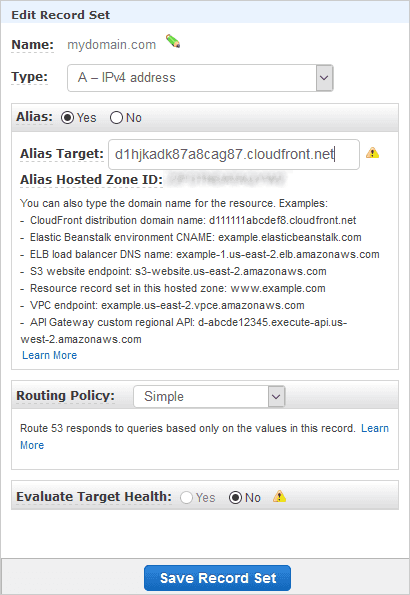
This has bound your naked domain to your CloudFront distribution, but we still
need to make sure the www. sub-domain works too. Click the blue “Create
Record Set” button at the top of the console, type www into the “Name” field,
set the type to be CNAME, and set the “Value” to be mydomain.com (or,
rather, your naked domain). You can up the TTL to a day, if you like, because
this configuration won’t change regularly; it’s up to you. Click the “Create”
button and sit back.
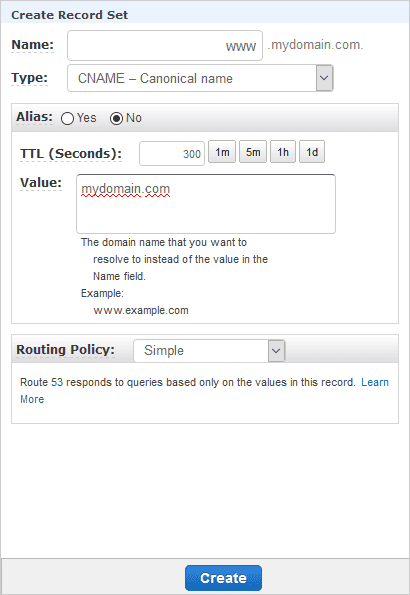
A CNAME record creates a new domain which will be resolved to the “canonical
name” (the value you entered) by a DNS lookup; i.e., when you enter
www.mydomain.com, the DNS resolution will provide the address for
mydomain.com instead. In our case, that ultimately resolves to our CloudFront
distribution. The original domain name queried is passed to the server that
gets resolved, which is how our Lambda can determine if it should perform a
redirect or allow the request to continue.
A full description of DNS falls far outside of the scope of this post. It’s quite interesting trying to understand how the internet works; it has evolved into quite a complex beast these days…
A sprinkle of patience
Now, we’re done! Take a victory-sip of whatever tea you’re currently drinking and relax for a moment. CloudFront takes a while to deploy because of the number of servers in the network. There’s an irony in a lightning-fast content delivery system taking a while to deploy within itself, but it’s worth it. After deployment has finished, try all the domains you’ve configured and marvel at the awesomeness!
Congratulations! You now have your own super-fast static corner of the internet!
- I know, it sounds a bit weird. Serverless looks like a promising alternative, but I haven’t investigated it properly yet. Hopefully I’ll be able to revisit this in the future.↩
- Usually you’d take this opportunity to configure environment variables and layers, but neither of these features are available for Lambda@Edge. The environment our function will operate in is extremely minimal.↩

